Several important factors to consider before buying a VPS are uptime, Internet connection speed, I/O speed, and CPU performance. Of course you can simply find some result of available benchmark tests submitted by users around the world at ServerBear.
But when you purchased the VPS and want to know its performance, then you can simply perform the benchmark test yourself, again, ServerBear will come in handy. But if you want second opinion regarding how fast is connection speed of your VPS, you can perform simple command line Speedtest.net test.
HOW TO TEST INTERNET SPEED IN COMMAND LINE
Most Linux-based Virtual Private Servers (vps) does not support GUI (graphical-based interface) so you have to manage everything from command line within your Terminal window or Putty.
SpeedTest.net is a well known Internet speed test available by simply accessing their site on any web browser that supports Flash. But they do also provide another way to conduct the test, via command line. So here it is the tutorial is all about.
HOW TO INSTALL SPEEDTEST CLI
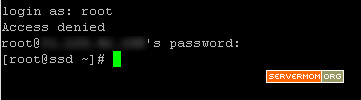
Step 1 – Login to your VPS as root or any user with superuser privilege (so you can use sudo). Windows users can make use of Putty while Linux and Mac can use Terminal.
Step 2 – Download the SpeedTest Python-based script using wget command:
1
| wget https://raw.github.com/sivel/speedtest-cli/master/speedtest_cli.py |
Step 3 – Now do some chmod little trick:
1
| chmod a+rx speedtest_cli.py |
Step 4 – Move the file to appropriate location:
1
| mv speedtest_cli.py /usr/local/bin/speedtest-cli |
Step 5 – Now chown the script to user and group root:
1
| chown root:root /usr/local/bin/speedtest-cli |
That’s it.
PERFORMING SPEED TEST
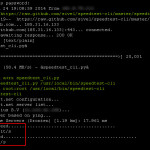
Use this basic magic command to conduct the test:
1
| speedtest-cli |
Here it is the screenshot pic of all the command syntax above:
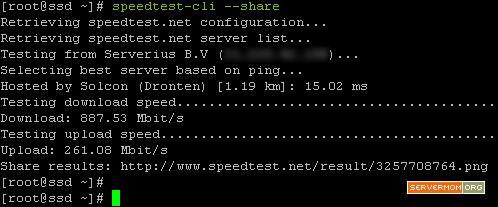
But you can also generate a cool SpeedTest.net’s badge using this command:
1
| speedtest-cli --share |
The test will be performed with an output image of your speed test result so you can share it with others:
Simply open the Share results url on your browser.
So, how’s my result above? Is it speedy enough? 
Anyway, normally SpeedTest will search for closest server in terms of geographic distance to conduct both download and upload test. That’s why the result is so high.
However, it has a cool feature allowing you to select to which SpeedTest.net’s server the test will be performed. Simply issue this command to see all available test locations:
1
| speedtest-cli --list |
It will then retrieve available test locations displayed in order based on closest servers first.

or add | more in the end of that syntax to display partially so you can scroll it down page by page:
1
| speedtest-cli --list | more |
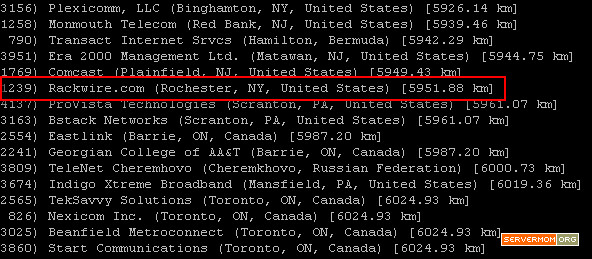
For example, I want to know how fast is the connection speed from my VPS (in Netherland, Europe) to my other VPS (in New York, USA). So I simply choose any SpeedTest.net’s server located within New York. In my example I will pick the one from Rackwire.com at Rochester, New York (Distance: 5951.88 km from my current NL VPS). The location has ID #1239.
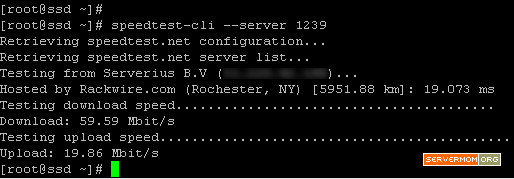
So I simply issue this command:
1
| speedtest-cli --server #number |
in my case is:
1
| speedtest-cli --server 1239 |
and here’s the result:
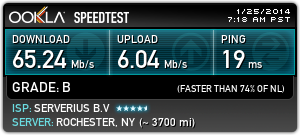
Not bad isn’t it? The second test with –share parameter:
So what’s yours? Do not hesitate to share it with us (me and other readers) via command section below. Also mention in which provider you purchased the vps from.
Không có nhận xét nào:
Đăng nhận xét